1. Devices & Instances
TelemFFB runs one instance per FFB device. If you fly with a single VPforce joystick base, one instance is all there is and you can mostly ignore this page. If you also have VPforce-powered pedals or a collective, a separate instance drives each device - and TelemFFB manages them for you.
1.1 Master and child instances
The instance you launch is the master. It owns everything global:
- The global pages of System Settings - Launch Options, Sim Setup, theme, and the global startup behavior options are only visible in the master instance.
- Auto-launching, monitoring, and revealing the child instances that drive your additional devices.
Child instances each connect to their own device and render effects for it, driven by the same simulator telemetry. They can run with a normal window, minimized, or headless (no window at all).
While DCS, MSFS and IL-2 do not natively support FFB on rudder or collective axes, TelemFFB plays its full effects suite through any VPforce device - so pedals and collectives get buffeting, ground rumble, and the rest even where the sim itself offers nothing.
1.2 How TelemFFB finds your devices
In most cases, you do not need to configure anything: on startup, TelemFFB enumerates the connected VPforce devices and auto-assigns any unassigned device slot.
- Assignment is by the device’s name as configured in VPforce Configurator: a name containing Joystick, Pedals, Collective, or Trimwheel assigns the device to that role.
- Devices whose names do not match fall back to the default Product IDs:
2055joystick,2054pedals,2053collective,2052trimwheel. - Auto-assignment never overrides a slot you have already assigned.
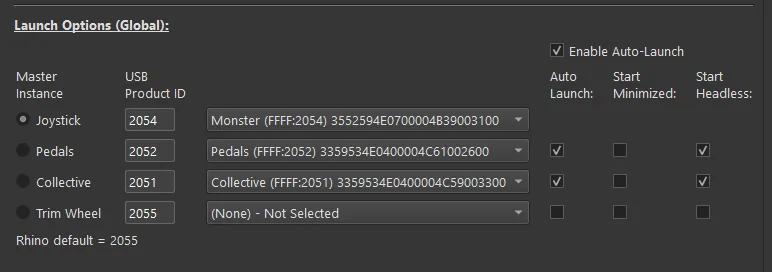
To assign devices manually - or fix an auto-assignment - each device role on the Launch Options page has a selector pulldown listing the connected VPforce devices. Pick the device for each role directly; the USB Product ID field fills in automatically from your selection. If you pick a device that is already assigned to another role, TelemFFB asks whether to override the other assignment or cancel.
1.3 Launch Options
Note
The Launch Options are global and are only visible in the Master instance of TelemFFB
These settings are found in System → System Settings → Launch Options. They control which device each instance connects to and which instances start automatically.
-
Device Selector
- Select the connected VPforce device for each role from the pulldown. Auto-assigned devices appear pre-selected.
-
Enable Auto-Launch
- Tick this checkbox to enable the auto-launch feature which will start additional instances of TelemFFB to communicate with your additional FFB devices.
-
Master Instance Radio Buttons
-
Independently of the auto-launch feature, the selected radio button defines the device that TelemFFB will connect to when it is launched.
-
When combined with the auto-launch feature, the selected device will act as the master instance for any additional spawned instances of TelemFFB.
-
-
USB Product ID
- Filled automatically from the device selector. The VID for all VPforce control boards is
FFFF; each device’s PID can be viewed (and changed) in the VPforce Configurator utility.
- Filled automatically from the device selector. The VID for all VPforce control boards is
-
Instance Auto Launch Options
-
Auto Launch
- Enable or disable auto-launching of an instance when the master instance loads.
-
Start Minimized
- Start the selected instance with its window minimized
-
Start Headless
- Start the selected instance with its window hidden
-
1.4 Working with child instances
After starting TelemFFB with auto-launch enabled, all of the device icons appear in the master instance’s Active Devices area. From there you can monitor each device’s status and switch between devices to configure their settings - each device has its own settings for every aircraft, so your pedals and joystick are tuned independently. See Active Devices Area for details.
To bring up the window of a minimized or headless child instance:
- use the master instance’s Window menu, or
- right-click the system tray icon and use the Instances menu.